When you start in the world of cold emailing, you’ll probably quickly come across acronyms and terms like DKIM, SPF, and DMARC. You find them everywhere, in blogs, forums, even in your nightmares. And of course, you ask yourself questions like: What the heck are these? Why are they so important? And the most dubious one: how do I set them up?
If you’re asking yourself these questions, you’re on the right track. Here, I’ll explain everything you need to know. Relax, take a sip of your coffee and keep reading.
Why Are SPF, DKIM, and DMARC Critical?
Before diving into the technique, let me tell you why it’s important to do a good warm-up of your email account:
Imagine you set out to finish a half marathon with 6 months of preparation. Yes, finishing the race is important, but does that mean you won’t do anything for those 6 months until the big day? Would you race without preparing? Surely not, because you know that without preparation you wouldn’t be able to finish even the first part of the race.
Well, the same goes for your email campaigns.
The Role of Warm-Up in Email Delivery
It all comes down to the efforts made by email servers to differentiate email frauds and scams from legitimate emails: Phishing, spoofing, and some other terms that you probably know.
These “entities” send emails pretending to be trustworthy entities like your bank or Amazon to steal confidential information like banking details or access credentials.
Preparing your domain for mass emailing is the best way to defend yourself from being categorized as one of them.
The warm-up is all that preparation process before sending your definitive campaigns, in essence, you’re preparing your domain for mass email sending. Why? Simply because you want your emails to land in your recipients’ inbox and not end up in the spam folder.
The Benefits of a Good Email Account Warm-Up
Doing a good warm-up brings many benefits.
First, it improves your sending reputation, which means that email servers see your emails as legitimate and not spam.
Second, it increases the open rate of your emails because, obviously, if your email lands in the inbox, there’s a higher chance of it being read.
And lastly, it helps you avoid future delivery issues, these are “signals” you send to the email servers.
In summary, we can say that a well-executed warm-up is the difference between the success and failure of your email campaigns.
Step-by-Step Guide to Setting Up SPF (Sender Policy Framework)
Now that you know why warm-up is so important, let’s get to action.
Understanding SPF
SPF, which stands for Sender Policy Framework.
It’s a kind of “stamp” that decides who can and who cannot send emails from your domain.
It’s an authentication system that prevents third parties from sending emails pretending to be your domain, a practice known as “spoofing”.
To do this, the sender’s domain publishes an SPF record in its DNS. This SPF record lists all the IP addresses that are authorized to send mail on behalf of the domain.
When the email is received, the recipient’s mail server can check this list to ensure that the email comes from an IP authorized for that domain.
Implementing SPF in Your Email Setup
SPF, or Sender Policy Framework, verifies that the servers sending emails on behalf of your domain are authorized to do so.
- An SPF record is basically a list of all the servers that are authorized to send mail from your domain. In this case, we want Gsuite to be one of them. So your SPF record will be something like ‘v=spf1 include:_spf.google.com ~all’. This line means that all servers used by Gsuite to send mail are authorized to send mail from your domain.
- Now, you need to add this SPF record to your domain’s DNS records. Create a new TXT type record and paste the SPF record you just created in the value field.
How to Configure DKIM (DomainKeys Identified Mail)
Okay, SPF is covered, let’s switch to DKIM:
The Role of DKIM in Email Security
DKIM is DomainKeys Identified Mail.
It’s an email authentication method that allows the recipient to check that emails claiming to come from a specific domain actually do come from that domain and have not been modified in the meantime.
Basically, it allows the recipient to verify that the email has not been altered in transit and that the sender is who they claim to be. To do this, the sender adds a digital signature to the email header.
When the email is received, the recipient (or their mail server) can verify this digital signature to confirm that it has not been modified and that the email comes from the domain it claims to.
Steps to Implement DKIM
DKIM, or DomainKeys Identified Mail, as we have mentioned, ensures that the emails sent from your domain are authentic and have not been altered in transit.
- Log in to your Gsuite account. In the admin console, go to “Apps” > “Google Workspace” > “Gmail” > “Authenticate email”.
- Select the domain you want to work with, then click on ‘GENERATE NEW RECORD’. You will now have a generated key. Take note of the key’s prefix (for example, “google”) and the key itself.
- Now, go to your domain provider and find the DNS management section. You need to create a new TXT record. In the host field, you should enter something like ‘prefix._domainkey’, replacing ‘prefix’ with what you noted earlier (for example, “google”). In the value field, paste the key you generated in step 2.
- Save the changes and wait a bit for the DNS record changes to propagate.
- Once the changes have propagated, you can go back to Gsuite and select ‘START AUTHENTICATION’. This will activate DKIM for your domain.
And that’s it! That’s how easy it is to set up DKIM.
DMARC (Domain-based Message Authentication, Reporting & Conformance) Setup
Last but not least, DMARC:
What is DMARC and Why it Matters
DMARC, or Domain-based Message Authentication, Reporting, and Conformance.
This is a protocol that uses SPF and DKIM to determine the authenticity of an email. DMARC aligns the domain in the “From” email header with the domain in the DKIM signature and the return-path domain verified by SPF.
Additionally, it allows domain owners to decide what to do with emails that fail these checks: whether to deliver them as is, put them in the spam folder, or outright reject them. It also reports to the domain owner about emails that fail DMARC authentication.
Configuring DMARC for Enhanced Email Security
Best Practices for Email Protocol Configuration
Setting things up correctly is just the beginning. To ensure the ongoing integrity and effectiveness of your email systems, it’s vital to adopt best practices
Regular Auditing of Email Authentication Methods
Regularly auditing your email authentication methods is crucial. Why? Because it helps you stay ahead of any potential issues that could compromise your email delivery.
Periodic reviews of your SPF, DKIM, and DMARC settings ensure that they are up-to-date and functioning as intended. This is essential, especially if there are changes in email servers or domain configurations.
To ensure that your SPF, DKIM, and DMARC configurations are effective, utilizing specific tools and techniques is essential. Here are some concrete examples:
- MXToolbox: This is a popular online tool that offers a range of services, including SPF, DKIM, and DMARC record checking. It can help you quickly identify if your records are correctly published in the DNS and if they conform to the standard syntax and policies.
- DMARC Analyzer: This specialized software provides deeper insights into your DMARC setup. It not only validates your DMARC record but also analyzes DMARC reports sent by email receivers, helping you understand how your emails are being processed and where potential issues might lie.
- Google Postmaster Tools: If you use Google Workspace (formerly G Suite), Google Postmaster Tools can be an invaluable resource. It provides data on your domain’s reputation, spam rate, and other factors that affect email deliverability. This information can help you pinpoint issues related to SPF, DKIM, and DMARC.
- SPF Record Checkers: There are several online SPF record checkers available that can validate your SPF record’s syntax and evaluate its effectiveness. These tools can also help you understand the impact of your SPF settings on email deliverability.
- DKIM Validators: Similar to SPF checkers, DKIM validators help you ensure that your DKIM records are correctly published and formatted. They can also simulate the DKIM validation process to confirm that emails sent from your domain are properly signed.
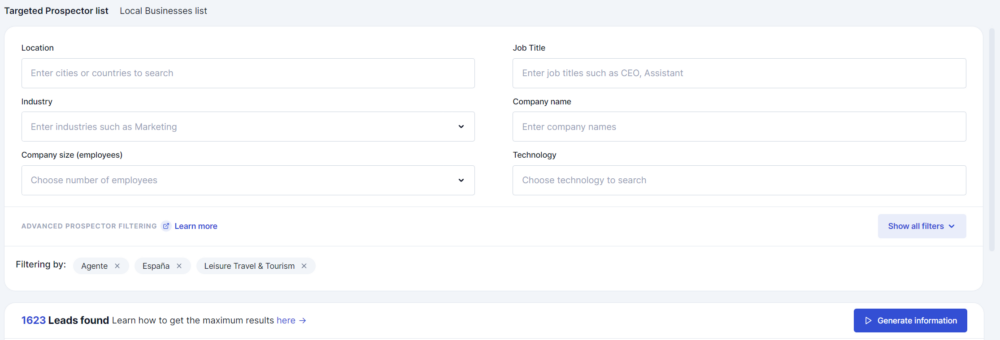
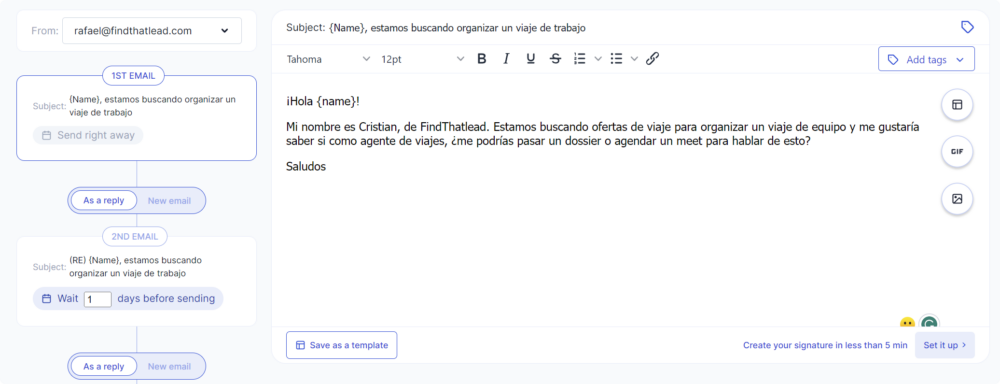
- FindThatLead: When doing a good warm-up for your email account, you want to make sure everything goes well to have the best chance of success. Here’s an effective way to do it using FindThatLead.
1. Generate a list with Prospector: Using the Prospector tool from FindThatLead, search for travel agencies. These companies often respond to emails, so you’ll likely get responses to your initial emails from the start.

2. Create your cold emailing campaign: Once you have your list, use FindThatLead’s Send Emails tool to design and launch your campaign. You can ask about personalized offers, as it’s an open question that invites a response.

By targeting a specific niche like travel agencies, which are likely used to responding to email inquiries, you can expect a relatively high response rate. This will send a positive signal to mail servers and help you avoid being labeled as spam.
Navigating Multi-domain and Subdomain Setups
When dealing with multiple domains and subdomains, the complexity of email configuration increases significantly.
Handling Multi-domain and Subdomain Configurations: Each domain and subdomain can have different email sending sources, and thus, different SPF and DKIM records. It’s crucial to manage these records carefully to avoid conflicts or gaps in authentication.
Maintaining Consistency and Security: Consistency in your email setup across all domains and subdomains is key. Ensure that your email policies and authentication practices are uniformly applied to maintain a strong security posture. Regular reviews and updates in line with your organization’s changing structure and needs are essential.
Addressing Common Configuration Challenges
Encountering challenges during the setup of SPF, DKIM, and DMARC is common, but knowing how to overcome them is what sets you apart.
Solving Common Setup Problems: Common issues like syntax errors in DNS records, propagation delays, or misalignments between SPF and DKIM records can impede your email deliverability. Being aware of these pitfalls and knowing how to troubleshoot them is crucial.
Strategies for Successful Configuration: Develop a checklist for setup, engage in regular monitoring, and stay informed about the latest best practices. Don’t hesitate to seek expert advice if you encounter persistent issues. Remember, a successful configuration is not just about getting it right once; it’s about maintaining it correctly over time.


