Whether it’s for security, curiosity or whatever, there are times when we want to know where an email is being sent from.
Tracking the location of an email is the best way to protect yourself from stalkers and scammers.
The reality is that it is possible by following a series of techniques and strategies that I have compiled and we are going to see together in this article to trace email locations.
Let’s cut the crap and get down to business.
Shall we get started?
Why is tracking the location from which an email is sent not so simple?
You may think that tracking the location of an email is simple, you take its IP and paste it into an IP tracker, but it is not always so, I explain:
The problem is in finding the IP, many times, the IP address that can be associated with an email is not static, ie, it changes every X time, and this is a problem if we want to know from where an email is sent.
Another problem is associated with mail servers (Gmail, Outlook, Yahoo…), these servers are located in different parts of the world, which is not necessarily where the sender is physically located.
So, if you use Gmail, your email can be processed from a server in the USA, and you can be in Castellón, Spain.
That’s not counting the possible VPNs, proxies, privacy policies, etc…
Gmail and the difficulty in obtaining IP addresses
Gmail is the most widely used emailing service in the world and has privacy and security policies in line with its reputation.
Google (the company behind Gmail) does not include the IP addresses of senders to prevent the IP address from being leaked so easily.
Also, as mentioned above, the IP address in the mail header is that of the Google server, not the sender.
Google only provides the real IP address under very specific circumstances (legal issues, for example).
Alternatives for trace email locations
Well, there are little tricks, they are less effective than the methods I am going to show you below but they are still valid and simple.
- If the email has attachments (files, images, multimedia…) you can use tools like ExifTool or even Google Lens to extract data from those files, which can give you the location from where a photo was taken, for example.
- You can google the email to see if it is in a directory or localized database, often associated with public profiles with demographic information and locations.
And, above all, the two methods that I put below, let’s see them.
Method 1: Using email reverse lookup tools
Reverse email search is a technique that allows you to search outside the usual channels.
Only by using the simplest techniques can you refine your search to get more accurate results.
How email reverse lookup tools work
Reverse email lookup tools work by entering an email address into a database to see if it is linked to additional information.
These tools can access data from various public domains, LinkedIn, private records, or social networks to provide details about the identity of the owner and track the location of an email.
More than anything, it’s a trick that helps us find out who an email address belongs to, or find their email address just by having their name.
Popular tools for tracking email location
- FindThatLead: FindThatLead, besides being a one-stop shop for lead generation, it also has a very strong reverse lookup tool that helps you identify who an email is coming from. You have a name and a domain and this tool pulls the emails for you.
- BeenVerified: This tool provides a detailed report on an individual based on their email address, including contact information, criminal history, social records and locations.
- Spokeo: It allows users to enter an email address and receive information about the owner of that address, including their likely location and social media profiles.
- Pipl: Effective for discovering social network connections that may reveal the location of the holder, based on publicly available sources of information.
Method 2: Tracing the location of an email thanks to social networks
Social networks “hide” more information than you think.
And it is a trick that works quite well, when we are looking for where an email comes from, we can use some of these “flaws” to take advantage and find out what we are looking for.
Linking emails to social network profiles
Many users tend to use the same nickname or similar variations in their social networks, forums, video games… all over the internet.
One trick is to search both Google and social networks for the nickname or email name you have received, testing variations of the nickname can also be very effective.
If you can find these profiles, analyzing the public information they provide will give you many clues about their location.
LinkedIn, for example, is a network where most professionals maintain profiles with detailed information about their work location and education.
Tools such as LinkedIn Email Finder or FindThatLead’s Social are ideal for extracting emails and associating them with specific profiles.
If you manage to link an email to a LinkedIn profile, the location on the profile can give you a good indication of where the sender is located.
Look at the user’s posts, photos and check-ins. If the target has posted images, investigate the location of those photos.
Even details such as timestamps and the nature of the places photographed can offer clues to their actual location.
Google Lens is your friend
Limitations and precautions in social network crawling
This method can lead to identifying incorrect accounts, especially if the email is fake or randomly generated. Spam or scam emails often use unverified or outright fake addresses.
Keep in mind that one person may have multiple social network accounts, sometimes associated with different locations. And this is a pain in the ass for the task of determining their real location.
Many users set their profiles to private mode, limiting access to their personal information to only their direct contacts or friends.
What to do if you discover a discrepancy
A “discrepancy” in the context of verification when tracking the location of an email refers to any inconsistency or anomaly found during the review of an email that could indicate that something is suspicious or does not match the expected information.
For example:
- If you investigate an email and the sender’s LinkedIn profile tells you they are based in Spain, but the email headers and other clues indicate the email was sent from Russia, Red Flag.
- If the sender’s name in the email does not match the names on the social media profiles linked to the same email address, Red flag.
- If the email says he is an employee of a certain company, but a check on LinkedIn shows that there is no record of that person working for the company mentioned, Red flag.
Blocking unwanted senders
If after an investigation you discover that an email comes from an unwanted or potentially dangerous source, block it, from second 1.
How is it done?
The procedure is the same for almost all mail servers
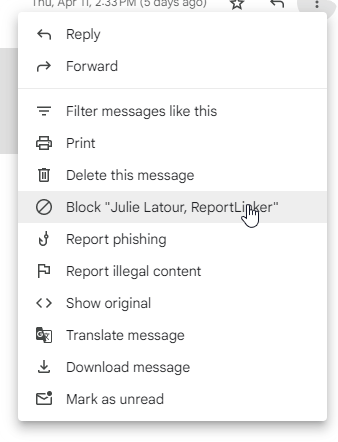
Open the email of the person you want to block, click on the three vertical dots next to the reply button, and select ‘Block [Sender’s name]’.

Options for Linux and Windows users
Users of both Linux and Windows operating systems can take even more measures to handle suspicious emails:
The main thing would be to install antivirus or security software, on Linux ClamAV and SpamAssassin work very well, on Windows you have Defender and Karpersky, to give you an example.
Also make sure your firewall is properly configured to block weird connections. Windows -> you can adjust the Windows Defender Firewall settings. On Linux -> UFW (Uncomplicated Firewall) or iptables are useful.
Ethical and safety considerations
Yes, you have to be a little careful about the legality of your actions, as well as ethical issues and, above all, for the safety of both yourself and others.
Protecting your online privacy and security
Protecting your own privacy and security online is a must, especially when you handle information that could be sensitive or personal. Here is a checklist:


